Sitecore's Speak: A Custom Component Part 2 - Speak Structure
written by jketchum
|February 2014
In the first blog about the "Foundation" of the Speak Component, I explained how the initial portions of the application were using WebAPI calls to get data and prepare data to be sent to the Speak application.
This blog will cover the Speak Component (Javascript and CSHTML) side of things and how it will use the returned data from WebAPI to communicate to other portions of Speak.
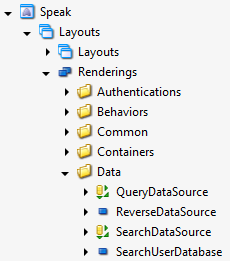
When creating a custom component for Speak, you can make an entry under the related folder under /core/sitecore/client/Speak/Layouts/Renderings/. Here, I created a new View Rendering called "SearchUserDatabase."
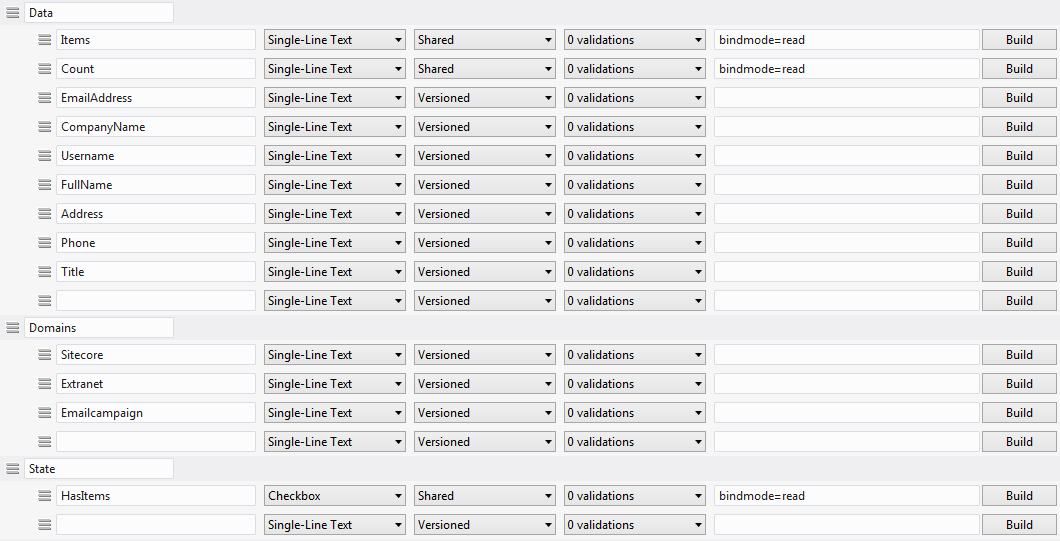
This View Rendering will have a template underneath it to hold the parameters. When creating a parameter template, don't forget to set a Base Template. Here, we can use the "ComponentBase" as a Base Template so that we can have basic items that every component will use, such as an Id to refer to the item.
In this parameter template, the fields "Items," "HasItems," and "Count" are set to be shared fields and has bindmode set to "read."
The resulting parameter template would look like this:
Now that the item is referenced in Sitecore, we can create the CSHTML and Javascript related to this item. Below is the CSHTML file I created for this component. The main function of this file is to get the input values from the user, such as "email address", and set it obtainable to the Javascript code. If this is not done, then the Javascript related to the file would not be able to see the email address searched for by the user, and the search would fail.
SearchUserDatabase.cshtml file:
@using Sitecore.Mvc
@using Sitecore.Mvc.Presentation
@using Sitecore.Web.UI.Controls.Common.UserControls
@model RenderingModel
@{
  var rendering = Html.Sitecore().Controls().GetUserControl(Model.Rendering);
  rendering.Class = "sc-SearchUserDatabase";
  rendering.Requires.Script("client", "SearchUserDatabase.js");


  rendering.GetString("emailaddress", "emailaddress");
  rendering.GetString("fullname", "fullname");
  rendering.GetString("username", "username");


  rendering.GetString("sitecore", "sitecore");
  rendering.GetString("extranet", "extranet");
  rendering.GetString("emailcampaign", "emailcampaign");

  var htmlAttributes = rendering.HtmlAttributes;
}
This is just the foreground of the component. The real magic lies inside the Javascript file, where functions are called on the event of something happening.
For a basic understanding of the general use of the Javascript file related to components, be sure to watch Sitecore Speak App Part 3 and following parts of YouTube videos by the same author.
Below is the code for my initialization method.
initialize: function (options) {
  this._super();
  this.set("username", "");
  this.set("emailaddress", "");
  this.set("fullname", "");
  this.set("companyname", "");
  this.set("address", "");
  this.set("phone", "");
  this.set("title", "");
  this.set("count", "\r\n 0 records found.");
  this.set("hasitems", "false");

  this.set("sitecore", "");
  this.set("extranet", "");
  this.set("emailcampaign", "");

  this.on("change:emailaddress", this.search, this);
  this.on("change:username", this.search, this);
  this.on("change:fullname", this.search, this);
  this.on("change:sitecore", this.search, this);
  this.on("change:extranet", this.search, this);
  this.on("change:emailcampaign", this.search, this);
}
What this method does is set the values and other settings upon start-up of the component. Specifically, I would like to point out the numerous group of "on change" settings. This sets up a listener that calls a certain method (in this case, this.search) upon the event specified.
The search code called is listed below.
search: function () {
  var emailaddress = this.get("emailaddress");
  var username = this.get("username");
  var fullname = this.get("fullname");
  var sitecore = this.get("sitecore");
  var extranet = this.get("extranet");
  var emailcampaign = this.get("emailcampaign");

  $.ajax({
    url: "/api/user/startsearch",
    type: "POST",
    data: {
      emailaddress: emailaddress, fullname: fullname, username: username
      , sitecore: sitecore, extranet: extranet, emailcampaign: emailcampaign
    },
    context: this,
    success: function (data) {
      var item = this;
      item.set("items", data);
      item.set("count", "\r\n" + data.length + " records found.");
      if (data.length > 0) {
        item.set("hasitems", true);
      } else {
        item.set("hasitems", false);
      }
    }
  });
}
As you can see from the code above, the search queries are referenced as variables and set through the ajax call. Upon completion, the resulting object is set as the "items" object, the count value is set, and the "hasitems" is set to true if there is data returned.
As described in the YouTube videos referenced above, these "item.set" calls change the value of the item in the component scope, making it possible to update other component's bound values to the new, changed values.
In the next blog (Final Steps), I will explain how to tie all the loose ends together and create a working application, complete with a CSV downloader.