A Better Optimizely B2B Commerce Cloud Order Approval Workflow
written by Jijendran Muruganandam - Software Developer
|November 2021
In B2B Commerce applications there are often multiple users that purchase items for the same customer (organization). Since multiple users are involved in the purchasing process, organizations often look for features in the B2B commerce platform to manage the purchasing process that minimize the misuse of funds.
There are two features in Optimizely B2B Commerce that help with this. If organizations need better budgeting control, they can manage purchasing processes by using out of the box (OOB) budget features. If budgeting is not needed to OOB Order Approval Workflow, a simple ordering workflow can be used. However, most of the time this method does not meet the needs of our clients.
In this blog I will discuss how we created an enhanced Order Approval Workflow to help our clients make the ordering process much faster.
Optimizely B2B Commerce Cloud OOB Order Approval Workflow
When using the Order Approval Workflow in Optimizely B2B Commerce, the Approver purchases items on behalf of the Requester. When a Requester sends an order for approval, the order shows up on Approver's queue. From there, the Approver opens the order, adds the order into their cart and the order checkout remains on the Requester's behalf.
There is no clear path for rejecting the order or any communication between Approver and Requester. The only way for the Requester to know if the order was approved is to see if the order is still in the approval queue. If it is not there, that means it was either approved or it was deleted by emptying the cart. In addition, the OOB workflow allows only one Approver per each Requester.
Enhanced Order Approval Workflow
The Enhanced Order Approval Workflow has made the approval workflow more seamless. We have added the following features in the workflow:
- A Requester can have multiple Approvers. In the case that multiple Approvers try to approve the same order at a time on the list page, the second Approver will be notified with a pop-up message saying the order has already been approved or rejected by this user. However, this scenario rarely happens where two Approvers open the order approval list page at the same time. If one Approver approves or rejects an order, the status changes and the other approver will not see in their list.
- Approval, Rejection and Review can be initiated from the Order Approval list page.
- If an Approver clicks on the "Approve" button on the list page, the Approver will be directed to the checkout page where he/she can check-out immediately. Once the order is submitted, the Approver will be directed back to the Order Approval page where he/she can take care of the next order in the list.
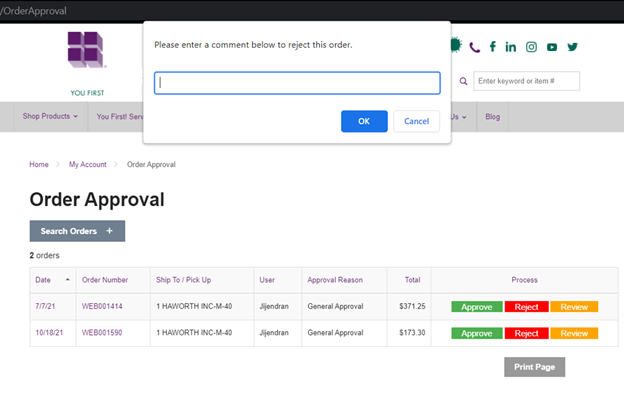
- If an Approver clicks on the "Reject" button, a pop-up will open where he or she can enter comments before an order gets rejected by setting the status of the order to void. The system keeps the order in void state for future reference.
- If an Approver clicks on the "Review" button because he/she wants to look at the order before approving or rejecting it, the Approver will be redirected to the intermediate page where the order can be approved or rejected.
- If an order gets rejected, an order rejection email workflow will notify other Approvers and Requestors with rejected/approved order details.
Multiple Approver Implementation
The Optimizely B2B Commerce Admin Console allows us to select only one Approver for a user. Since we cannot change the Admin Console, we decided to insert the approvers (by username) separated by commas and update the User label in the Custom property to say Approvers as shown in the following screenshot.

The Approvers will get access to order approval lists based on Optimizely's ApproverUserProfileId field in the Customer Order object.
We added a new handler, AddAdditionalApproversToCart in the UpdateCartApprovalHandler to add additional approvers to cart as shown below. Basically, we are validating the provided additional users and adding them to the customer orders additionalApprovers custom property and this handler will execute only on the order approval list page where all order status will be AwaitingApproval.
Code Snippet:
namespace Extensions.Modules.OrderApproval.Services.Handlers.UpdateCartApprovalHandler
{
    [DependencyName(nameof(AddAdditionalApproversToCart))]
    public class AddAdditionalApproversToCart : HandlerBase<UpdateCartParameter, UpdateCartResult>
    {
        public override int Order => 1550;

        public override UpdateCartResult Execute(IUnitOfWork unitOfWork, UpdateCartParameter parameter, UpdateCartResult result)
        {
            if (!parameter.Status.EqualsIgnoreCase("AwaitingApproval"))
                return this.NextHandler.Execute(unitOfWork, parameter, result);
            CustomerOrder cart = result.GetCartResult.Cart;
            var userProfileId = SiteContext.Current.UserProfileDto.Id;
            var additionalApprovers = unitOfWork.GetRepository<UserProfile>().Get(userProfileId).GetProperty("approvers", string.Empty);

            List<string> additionalApproverList = additionalApprovers.Split(',').ToList();

            string validApprovers = string.Empty;

            foreach (var additionalApprover in additionalApproverList)
            {
                var trimAdditionalApprover = additionalApprover.TrimStart(' ').TrimEnd(' ');
                if (unitOfWork.GetRepository<UserProfile>().GetTableAsNoTracking().Any(x => x.UserName.Equals(trimAdditionalApprover, StringComparison.OrdinalIgnoreCase)))
                {
                    validApprovers += trimAdditionalApprover + ",";
                }
            }

            if (!string.IsNullOrEmpty(validApprovers))
            {
                var trimValidApprovers = validApprovers.TrimEnd(',');
                cart.SetProperty("additionalApprovers", trimValidApprovers);
                unitOfWork.Save();
            }

            return this.NextHandler.Execute(unitOfWork, parameter, result);
        }
    }
}
Order Approval List Page for Multiple Approvers
Displaying order approvals for all assigned approvers in list page
Optimizely B2B Commerce Cloud generates the carts query, executes it in the database, and returns the cart collection on the Order Approval list page based on the order status AwaitingForApproval. Filtering in the carts query occurs in the ApplyFiltering handler where it checks the status (saved/AwaitingApproval) of carts to fetch the details accordingly. We modified this (order 600) to get the AwaitingApproval carts for its additional approvers as well.
We loop through AwaitingApproval carts one by one, checking if that cart has additional Approvers and allowing the logged in user to see the cart if they are one of the additional Approvers. We then add the cart IDs into a currentUserHasAccessToCustomerOrders list if the logged in user is one of the Approvers to that cart.
After that, we check if the current user is an Approver (Buyer 3) and form the carts query with an OR condition We display the cart if
- Cart's approver is the logged in user (original Approver) using the OOB functionality
- Logged in user is one of the additional Approvers based on the cart ID list we have
Administrators have access to all carts, so additional changes are not needed for his or her role. Therefore, we just have a condition to restrict the cart for other users with Buyer 1 role. We check if the current logged in user is the cart initiator and then display carts only for them.
Code Snippet:
result.CartsQuery = result.CartsQuery.Where(o => o.Status == parameter.Status);
if (StringExtensions.EqualsIgnoreCase(parameter.Status, "AwaitingApproval"))
{
    var awaitingApprovalOrders = result.CartsQuery.ToList();
    List<string> currentUserHasAccessToCustomerOrders = new List<string>();

    foreach (var aao in awaitingApprovalOrders)
    {
        var additionalApprovers = aao.GetProperty("additionalApprovers", string.Empty).Split(',').ToList();
        if (additionalApprovers.Any() && additionalApprovers.Contains(userProfile.UserName))
        {
            currentUserHasAccessToCustomerOrders.Add(aao.Id.ToString());
        }
    }
    if (SiteContext.Current.IsUserInRole("Buyer3"))
    {
        result.CartsQuery = result.CartsQuery.Where(o => o.ApproverUserProfileId == (Guid?)userProfile.Id || currentUserHasAccessToCustomerOrders.Contains(o.Id.ToString()));
    }
    else if (!SiteContext.Current.IsUserInRole("Administrator")) // Admin will have full access no need to filter for him, but all other will have restriction filter by initiated user
    {
        result.CartsQuery = result.CartsQuery.Where(x => x.InitiatedByUserProfileId == (Guid?)userProfile.Id);
    }
}
Order Approval and Rejection Implementation
Customized Approve / Reject Workflow
On this page we verify if the logged in user has permission to approve orders from the account service and display the Process column on order lists table as shown in the below screenshot. The Process column will be displayed only for the approvers.
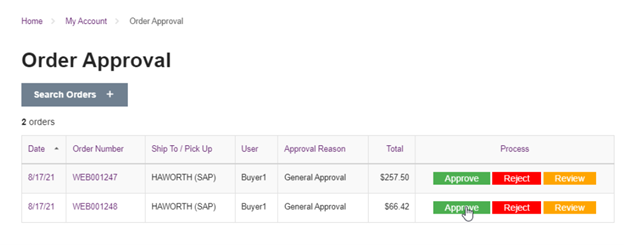
We customized the order approval list table to display three buttons for each order list, I) Approve, II) Reject, and III) Review. We added Approve and Reject methods in CustomOrderApprovalListController; review is just navigating user to the details page.
Approve:
The approveOrder method receives the cart (order which needs approval) as a parameter. We set the status of the cart to "Cart" and use the out of the box updateCartFromCartService to move the awaiting order to current cart. We have a reviewPayUri data attribute on the Approve button which holds the review and payment page URLs. On updateCartCompleted we redirect the user to the payment page.
Reject:
We pass the order which needs rejection as a parameter to this method and prompt the user to confirm it with an optional message. We then pass it to the rejection email as a cart custom property "rejectionComment", set the status of cart to "Void" and use the out of the box updateCartFromCart service to reject the cart by setting the status to "Void". We have an orderApprovalUri data attribute behind the Reject button which holds the order approval page URL. On updateCartCompleted we redirect the user to the order approval list page after a delay of 2 seconds.
Code snippet:
approveOrder(cart): void {
    cart.status = "Cart";
    var reviewPayUri = $("#approve").attr('reviewPayUri');
    this.cartService.updateCart(cart).then(
        (cart: CartModel) => { this.updateCartCompleted(reviewPayUri, 0); },
        (error: any) => { alert(error); });
}

rejectOrder(cart): void {
    var rejectionComment = prompt($('#decline').attr('rejection-title'));
    if (rejectionComment !== null) {
        if (rejectionComment !== '') {
            if (!cart.properties) {
                cart.properties = {};
                cart.properties["rejectionComment"] = rejectionComment;
            } else {
                cart.properties["rejectionComment"] = rejectionComment;
            }
        }
        cart.status = "Void";
        var orderApprovalUri = $("#decline").attr('orderApprovalUri');
        this.cartService.updateCart(cart).then(
            (cart: CartModel) => { this.updateCartCompleted(orderApprovalUri, 2000); },
            (error: any) => { this.updateCartCompleted(orderApprovalUri, 2000); });
    }
}

protected updateCartCompleted(reviewPayUri: string, delay: number): void {
    setTimeout(() => window.location.href = reviewPayUri, delay);
}
Order Approval List View:
<td class="col-process" ng-if="vm.account.canApproveOrders">
     <a id="approve" reviewPayUri="[% urlForPage 'ReviewAndPayPage' %]" ng-click="vm.approveOrder(cart)"> [% translate 'Approve' %]</a>
     <a id="decline" rejection-title="[% translate 'Please enter a comment below to reject this order.' %]" orderApprovalUri="[% urlForPage 'OrderApprovalListPage' %]" ng-click="vm.rejectOrder(cart)"> [% translate 'Reject' %]</a>
     <a id="review" ng-href="[% urlForPage 'OrderApprovalDetailPage' %]?cartid={{cart.id}}"> [% translate 'Review' %]</a>
 </td>
Customized OrderApprovalDetailController adds reject functionality
Like the changes in the list page, we have order Approve and Reject buttons in the details page.
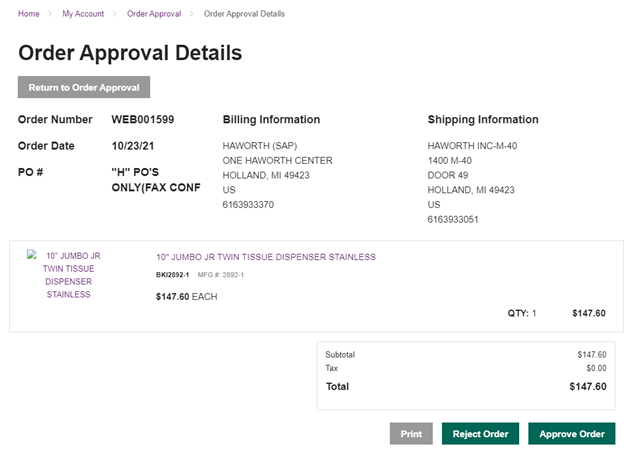
We set the status of cart to Cart in the approveOrder method and added the username into a custom property firstApprover - this property will be useful to identify if someone is already in process of approving that order.
Similarly, we have the rejection method to set the status as Void. We have a customCartFailed method to display a pop-up if the user has already rejected/approved that order. We validate with an error message that contains reject or approve keywords sent from the server API error result.
We send the rejected email in the below format.
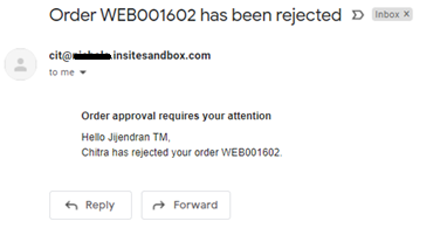
Just in case two approvers open the order approval list page at the same time, they will see the same WEB001603 order in the list. Consider this scenario where Chitra already approved WEB001603 order, and she is in process of submitting it. If another approver tries to approve or reject, they will get a pop-up saying the order WEB001603 is already approved by Chitra.
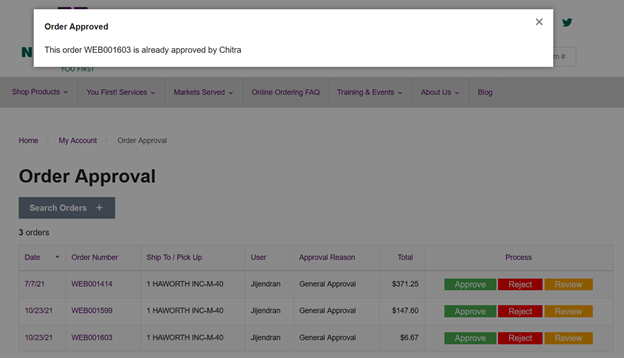
If Chitra rejects the order, they will see an "Order Rejected" popup message.

If the second approver goes to the details page by clicking Review, then they will see the message in the details page.

Code Snippet:
approveOrder(cartUri: string): void {
    this.approveOrderErrorMessage = "";
    this.cart.status = "Cart";
    this.cart.properties["firstApprover"] = this.account.userName;

    this.cartService.updateCart(this.cart).then(
        (cart: CartModel) => { this.updateCartCompleted(cartUri, cart); },
        (error: any) => { this.updateCartFailed(error); });
}

rejectOrder(cartUri: string): void {
    this.approveOrderErrorMessage = "";
    this.cart.status = "Void";

    this.cartService.updateCart(this.cart).then(
        (cart: CartModel) => { this.updateCustomCartCompleted(cartUri, cart); },
        (error: any) => { this.updateCustomCartFailed(cartUri, error); });
}

protected updateCustomCartCompleted(cartUri: string, cart: CartModel): void {
    this.coreService.redirectToPath(cartUri);
}

protected updateCustomCartFailed(cartUri: string, error: any): void {
    if (error.message.contains("rejected") || error.message.contains("approved")) {
        this.approveOrderErrorMessage = error.message;
        this.coreService.redirectToPath(cartUri);
    } else {
        this.approveOrderErrorMessage = error.message;
    }
}
We added a new UpdateOrderApproval method in the UpdateCartHandler. This is where our core logic resides, and it sends the approve/reject email.
This handler is executed when an approver rejects/approves an order. We execute this handler only when the cart status is cart or void. The status of cart is set to cart while approving and void while rejecting. After the validation we assign the current UserProfileId as the cart's ApproverUserProfileId, and the regular approval workflow takes care the of rest. Only minimal changes on the email functionality are required where we need to just include the additional approvers in the email list.
Code Snippet:
public override UpdateCartResult Execute(IUnitOfWork unitOfWork, UpdateCartParameter parameter, UpdateCartResult result)
{
    // update the cart status
    if (parameter.Status.EqualsIgnoreCase("Cart") || parameter.Status.EqualsIgnoreCase("Void"))
    {
        result.GetCartResult.Cart.ApproverUserProfileId = SiteContext.Current.UserProfileDto.Id;
        if (parameter.Status.EqualsIgnoreCase("Void"))
        {
            result.GetCartResult.Cart.Status = parameter.Status;
            unitOfWork.Save();
            this.SendRejectedEmail(unitOfWork, result.GetCartResult.Cart, result, parameter);
            return this.CreateErrorServiceResult<UpdateCartResult>(result, SubCode.GeneralFailure, $"The order {result.GetCartResult.Cart.OrderNumber} is rejected");
        }
        unitOfWork.Save();
    }
    return this.NextHandler.Execute(unitOfWork, parameter, result);
}
We made changes on the review and pay controller to return the user to the order approval list page upon placing the order.
Order Approval Notification Implementation
Send confirmation email:
We have a customized SendConfirmationEmail handler to add additional approvers and requestor in the ToAddressList of order confirmation email and the original approver in ccAddressList.
In the below snippet, the Approvers object will have the additional Approvers from the cart's custom property, while adding the cart's approver in the ccList and requestor in toList.
if (!string.IsNullOrEmpty(result.GetCartResult.Cart.ApproverUserProfile?.Email))
{
    ccAddressesList.Add(result.GetCartResult.Cart.ApproverUserProfile.Email);
}
if (!string.IsNullOrEmpty(result.GetCartResult.Cart.InitiatedByUserProfile?.Email))
{
    toAddressesList.Add(result.GetCartResult.Cart.InitiatedByUserProfile.Email);
}
We filter out the duplicate emails by intersecting both ToAddress and ccAddress lists when sending the confirmation email.
Code Snippet:
public override UpdateCartResult Execute(IUnitOfWork unitOfWork, UpdateCartParameter parameter, UpdateCartResult result)
{
    if (!StringExtensions.EqualsIgnoreCase(parameter.Status, "Submitted"))
        return this.NextHandler.Execute(unitOfWork, parameter, result);
    EmailList byName = unitOfWork.GetTypedRepository<IEmailListRepository>().GetOrCreateByName("OrderConfirmation", "Order Confirmation", "");
    List<string> list = this.buildEmailValues.Value.BuildOrderConfirmationEmailToList(result.GetCartResult.Cart.Id);

var otherApprovers = result.GetCartResult.Cart.GetProperty("additionalApprovers", string.Empty);

var toAddressesList = new List<string>();
var ccAddressesList = new List<string>();

if (!string.IsNullOrEmpty(result.GetCartResult.Cart.ApproverUserProfile?.Email))
{
    ccAddressesList.Add(result.GetCartResult.Cart.ApproverUserProfile.Email);
}

if (!string.IsNullOrEmpty(result.GetCartResult.Cart.InitiatedByUserProfile?.Email))
{
    toAddressesList.Add(result.GetCartResult.Cart.InitiatedByUserProfile.Email);
}

if (!string.IsNullOrEmpty(result.GetCartResult.Cart.InitiatedByUserProfile?.ApproverUserProfile?.Email))
{
    toAddressesList.Add(result.GetCartResult.Cart.InitiatedByUserProfile.ApproverUserProfile.Email);
}

if (!string.IsNullOrEmpty(otherApprovers))
{
    var otherApproversList = otherApprovers.Split(',');
    toAddressesList.AddRange(otherApproversList.Select(otherApprover => unitOfWork.GetRepository<UserProfile>()
            .GetTableAsNoTracking()
            .FirstOrDefault(x => x.UserName.Equals(otherApprover, StringComparison.OrdinalIgnoreCase)))
        .Select(otherApproverEmail => otherApproverEmail?.Email));
}

List<string> addressesList = list.Union(toAddressesList).ToList();

var toAddresses = addressesList.Union(ccAddressesList).ToList();

if (ccAddressesList.Any() && !toAddresses.Intersect(ccAddressesList).Any())
{
    this.emailService.Value.SendEmailList(new SendEmailListParameter()
    {
        EmailListId = byName.Id,
        ToAddresses = toAddresses,
        TemplateModel = result.ConfirmationEmailModel,
        UnitOfWork = unitOfWork,
        TemplateWebsiteId = SiteContext.Current.WebsiteDto?.Id,
        CcAddresses = ccAddressesList
    });
}

else
{
    this.emailService.Value.SendEmailList(new SendEmailListParameter()
    {
        EmailListId = byName.Id,
        ToAddresses = toAddresses,
        TemplateModel = result.ConfirmationEmailModel,
        UnitOfWork = unitOfWork,
        TemplateWebsiteId = SiteContext.Current.WebsiteDto?.Id
    });

}
return this.NextHandler.Execute(unitOfWork, parameter, result);
}
Send rejection notification email
We injected an email service in the UpdateOrderApproval handler and added a method to send the rejection email. Also, we created a new email template named RejectedOrderForApproval and prepared the required model to populate the data into an email. We get the additional approvers email address from the cart's custom property and formed ToAddressList.
Code snippet:
public void SendRejectedEmail(IUnitOfWork unitOfWork, CustomerOrder cart, UpdateCartResult result, UpdateCartParameter parameter)
{
    try
    {
        var initiatedByUserProfile = cart.InitiatedByUserProfile;
        var approverUserProfile = cart.ApproverUserProfile;
        var approverMessage = result.GetCartResult.ApproverReason;
        var cartLines = cart.OrderLines;

        var emailList = unitOfWork.GetTypedRepository<IEmailListRepository>()
            .GetOrCreateByName("RejectedOrderForApproval", "Rejected Order For Approval");
        dynamic emailModel = new ExpandoObject();
        emailModel.RequestorName = initiatedByUserProfile.FirstName + ' ' + initiatedByUserProfile.LastName;
        emailModel.RequestorEmail = initiatedByUserProfile.Email;
        emailModel.ApproverName = approverUserProfile.FirstName + ' ' + approverUserProfile.LastName;
        emailModel.ApproverEmail = approverUserProfile.Email;
        emailModel.ApproverMessage = approverMessage;
        emailModel.OrderNumber = cart.ErpOrderNumber == string.Empty ? cart.OrderNumber : cart.ErpOrderNumber;
        emailModel.RejectionComment = parameter.Properties.ContainsKey("rejectionComment") ? parameter.Properties["rejectionComment"] : string.Empty;

        emailModel.CartLines = new List<ExpandoObject>();
        foreach (var cartLine in cartLines)
        {
            dynamic cartLineModel = new ExpandoObject();
            cartLineModel.ProductName = cartLine.Product.Name;
            cartLineModel.ShortDescription = cartLine.Product.ShortDescription;
            cartLineModel.QtyOrdered = decimal.ToInt32(cartLine.QtyOrdered);
            emailModel.CartLines.Add(cartLineModel);
        }

        var toAddressesList = new List<string> { initiatedByUserProfile.Email, initiatedByUserProfile.ApproverUserProfile.Email};

        // Adding additional approver's email to order approval email
        var otherApprovers = cart.GetProperty("additionalApprovers", string.Empty);

        if (!string.IsNullOrEmpty(otherApprovers))
        {
            var otherApproversList = otherApprovers.Split(',');
            toAddressesList.AddRange(otherApproversList.Select(otherApprover => unitOfWork
                    .GetRepository<UserProfile>()
                    .GetTableAsNoTracking()
                    .FirstOrDefault(x => x.UserName.Equals(otherApprover, StringComparison.OrdinalIgnoreCase)))
                .Select(otherApproverEmail => otherApproverEmail?.Email));
        }

        var cartOrderNumber = cart.ErpOrderNumber == string.Empty ? cart.OrderNumber : cart.ErpOrderNumber;

        var emailSubject = emailList.Subject.Replace("{0}",cartOrderNumber);

        var emailListParameter = new SendEmailListParameter()
        {
            UnitOfWork = unitOfWork,
            EmailListId = emailList.Id,
            TemplateWebsiteId = SiteContext.Current.WebsiteDto.Id,
            TemplateModel = emailModel,
            Subject = emailSubject,
            ToAddresses = toAddressesList
        };

        emailService.SendEmailList(emailListParameter);
    }

    catch (Exception exception)
    {
        this.CreateErrorServiceResult<UpdateCartResult>(result, SubCode.GeneralFailure, $"Failed to send order rejected email, exception {exception.Message}");
    }
}
Conclusion:
The Optimizely B2B Commerce Cloud architecture is very flexible, and it allowed me to quickly customize the order approval workflow per the needs of our client. We have not seen any issues after deploying the changes to production.


